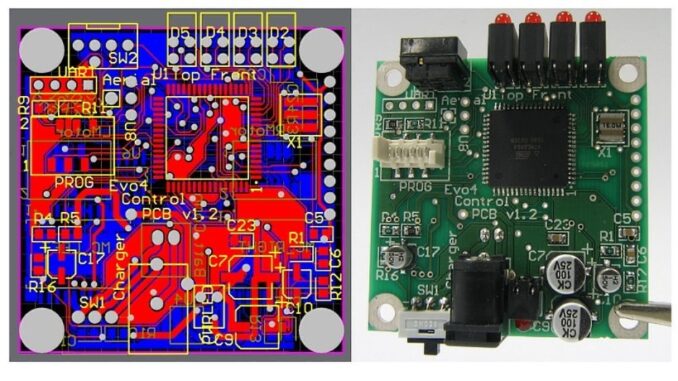
Electronic circuit boards, commonly known as printed circuit boards (PCBs) such as the example pictured above, come in all sizes and shapes – and occasionally, colors other than green. A PCB holds all the electronics and electrical components needed for the board to perform a function in some capacity such as a hand-held calculator, a controller inside your washing machine, the cruise control in your car, and all the various circuit boards in a computer. PCBs are used everywhere in practically everything that uses electricity.
A very simple circuit may only need one side of the board “printed” with “runs” – thin copper strips etched onto the board which connect the components in a logical order. These flat copper strips do the job of common copper wires, connecting together microchips, resistors, capacitors, inductors, etc., in a compact space. The important point to understand here is that these runs cannot touch or cross another run, as that would cause a short circuit. (That’s a bad thing!)
Today’s PCBs are almost always at least double-layered and often multi-layered. Double-layered, or double-sided means there are circuits printed on both sides of the board. Multi-layered means there are layers sandwiched in between the two outer sides of the board. The purpose for this layering of circuit runs is to provide an electrical path for each connection between components, again without touching or crossing another connection on the same layer.
Computers are now absolutely necessary to design multi-layered PCBs with hundreds of components and possibly thousands of connections. However, decades ago, before every engineer had a computer on their desk, this work was done manually by people with mad skills who specialized in PCB layout design. Unsurprisingly, it helped if the engineer was also an artist because it allowed the designer to visualize in their mind, or ‘see’ what the PCB should look like when all runs were drawn correctly. You may have seen older pictures featuring photos of PCBs that have been sold as works of art. Computer-designed PCBs can have eye-appeal too, as the photo above attests. While PCBs do have a certain artistic appeal (especially if the beholder is an engineer) they are only two-dimensional, or at best, very thin three-dimensional works of art.
Eirik Brandal, an artist with electrical engineering skills has designed and built several 3D electronic sound and light sculptures over the past several years. He calls his best and most recent project, “ioalieia”. Brandal’s work purposely leaves out the PCB, instead creating “scaffolding” by soldering straight metal wires together. The scaffolding serves the dual purpose of electrical “runs” and providing a three-dimensional support lattice. Whereas the runs on a circuit board are largely hidden from sight, Brandal’s scaffolding is right out there in 3D plain-sight. One can immediately see the complexity of all those runs and connections, a beautiful thing in and of itself. The clean, striking sculpture of electronic components is appealing to the eye, featuring a vaccum tube, discrete electronic components, and a few subtle LED lights.
The electronics utilize both analog and digital citcuits and techniques to make otherworldly music, the kind of sounds that belong in a sci-fi movie. The hardware can be software-configured via Wi-Fi to produce different sounds. The two videos below showcase two different songs that Brandal created. This is a work of art that not just anyone can do.
First video is cued to start at the 12:05 mark. Most of that video shows how Brandal built his sculpture, which you can watch by replaying the video from the beginning.
“Building An Electronic Sound Sculpture | How I Made ‘ioalieia'” (13:11)
“ioalieia (second song) | electronic sound and light sculpture” (3:15)
